Saturday, July 17, 2010
Canyonlands National Park, Utah
Aside from Arches, Canyonlands National Park was the other major attraction to see on my Moab trip. Canyonlands is a very different land than Arches. In Arches, you look up or climb up to see most of the landmarks. The rock formations sticking up from the ground are is due to periods of geological turmoil and uplift, plus erosion. In Canyonlands, you look down to see the landmarks. The Colorado and Green rivers sculpted the land lower and lower into a deep and wide canyon, from years of gravity's exertion and erosion. Canyonlands as actually rather similar to the Grand Canyon.
Canyonlands is located just over 30 miles from Moab, right next to Dead Horse Point State Park. Here's a detailed, interactive map of Canyonlands, from the official park website. You can click on the map to enlarge. As you can see, Canyonlands is a fairly big park. The park is actually divided in three areas: Island in the Sky, the Maze, and the Needles. Separating the areas are the canyons carved by the Colorado and Green Rivers, which flow in a y-shaped path through the park. In fact, the canyons are so big that you can't cross between the areas; you need to leave the park and go around in order to get to a different area. Most people, like me, only visit the Island in the Sky area. If you have extra time, you can visit the Needles. The Maze is very remote, with few marked trails, and it requires something like a 4x4 plus a hiking permit. Canyonlands's multiple areas is similar to the Grand Canyon's - the North Rim and South Rim are entirely separate.
Green River Overlook
The Green River is one of the two rivers that is responsible for carving the terrain of Canyonlands National Park. It's actually a tributary of the Colorado River. One neat thing about Canyonlands is that you can see the rivers in the canyons pretty easily. In the Grand Canyon, you need to hike pretty far in order to see the Colorado River. Seeing the rivers up close makes it easier to understand how their forces could have sculpted these deep canyons over millions of years.
Mesa Arch
Canyonlands has its own famous Arch, Mesa Arch. There are only a few arches in Canyonlands, as opposed to the dozens of arches in Arches. Mesa Arch is pretty cool though, and there is a great view behind it.
There were plenty of visitors at the parks. Not nearly as many as Yellowstone, but enough. Especially neat was that many of the visitors were either French or German. Bonjour! Guten tag! It's fun to include other visitors in your travel photos :)
Viewpoints Galore
There are lots of places for hiking and viewing in the Island in the Sky area. Here are a few. The first photo is of Candlestick Tower. The second is of the cool dirt road you can take down the Shafer Canyon.
Grand View Point
The south end of the Island in the Sky area is Grand View Point. It's as close to the center of Canyonlands as you can get. As the name suggests, there is quite a grand view of the park here. Below you are more river gorges and canyons. In the distance, you can see the Needles and the Maze areas of the park.
Here's a closeup of the canyon. All those needle-like pillars are neat. You can see a lot more of them in the Needles area of the park.
Here's a panoramic view. Click on it (or on any photo) to view in full screen.
Sunset at Upheaval Dome
Upheaval Dome is located in the northwest corner of the park. It is an interesting geological landmark because there was some kind of event that flipped the layers of rock. You can see the white "salt dome" sticking out of the ground in the lower-right of the photo below. The salt layer is supposed to be covered by many other layers of rock. Scientists think it was either some crazy movement of the salt bed, or it an asteroid hit it. Or maybe aliens came here? :)
Most of my photos of Canyonlands were taken on Sunday, during the day. However, these pics from Upheaval Dome were taken on Saturday evening, after my visit to Dead Horse Point. To be honest, I didn't pick the best spots for a sunset. But oh well, you will have to look at my sunset pics anyways :)
Next article topic: Arches National Park, part 2
Check out this article and others from my blog:
- This article
- All articles on Utah 2010 trip
- Slideshow of Utah 2010 trip photos on Flickr
- Blog home
Friday, July 16, 2010
An Evening in Arches National Park (Arches Part 2)
Arches National Park was so cool that I came back to see more the next day (Sunday). This time, the visit started in the early evening. My goal was to capture the warm evening sunlight against some of the rock formations I (intentionally) skipped the last time. In case you missed it, here's a link to my earlier visit to Arches National Park.
Courthouse Towers Area
The Courthouse Towers area is the first major area you see in the park. There are several attractions clustered here. Park Avenue is a kind of valley between two large sets of rock formations. The rocks are at least 100 feet high. In the first photo below, the Park Avenue Trail takes you along the valley for a mile. The crazy long but skinny rock structure (known as a "sandstone fin") on the right is the Organ. I think it is supposed to look like the pipes of a large pipe organ in a church.
The next two photos below are of rock structures found on the left side of the above Park Avenue photo. The first photo is of the first big formation along Park Avenue. I don't know what its name is though. The second photo is of the Three Gossips.
Courthouse Towers is a pretty imposing structure itself. Look how small the cars look compared to the Towers! The Park Avenue trail ends at Courthouse Towers. You can drive directly there too.
Balanced Rock
The next major section of the park is the Windows. I actually went here on Saturday morning, to catch the sunrise. One landmark I skipped, however, was Balanced Rock. It's supposed to shoot better with evening light. As the name suggests, it's a large round rock that is balanced on a column of rock. Don't breathe too hard - it might fall!
Delicate Arch
The highlight of Arches National Park is Delicate Arch. In a park full of arches, Delicate Arch stands above the rest. It's Utah's state symbol, in fact. And it might be the most well known arch in the world. Maybe the only exception is l'Arc de Triomphe in Paris, but that arch was built slightly differently haha...
In many parks, the most well-known attractions are super easy to get to. This is not true about Delicate Arch. Yes, there's a "viewpoint" for the arch that is right next to a parking lot. But the view is from 1.5 miles away. You need a good pair of binoculars to see anything from the viewpoint. Therefore, you have to go on a hike in order to see the arch for real.
The Delicate Arch Trail is a short, but surprisingly difficult hike. It's only 1.5 miles long, no big deal. But it's almost a 500 foot climb, and parts of the hike involve walking along rock ledges. Don't get me wrong - it's not super hard. But you need to be reasonably fit and have some decent balance to get there. Oh yeah, the hike is very exposed to the sun. So bring a hat, sunscreen, and lots of water. Also, going in the evening is much safer on the skin.
The hike starts out really easy. The first half mile of the trail is pretty flat and well worn. It's a breeze, and you feel like you'll get to Delicate Arch any second now....
Then you get to the second half mile - the hard part of the trail. Most of the climbing on the trail is done in this second half mile. You have to hike up a mountain of slickrock (see photo above) at a constant 15-30 degree angle. To digress a little, I don't know why it's called slickrock; the rock is actually rather sticky and provides good traction. Anyways, you'll probably get a bit winded though. I certainly did, but I made it fine enough. I suffered a bit, however, climbing down the slickrock. The descent at a constant 15-30 degrees caused a lot of stress on my bad knee; there are no switchbacks on this trail. My knee was a bit sore the next day.
The third half mile is much more palatable - a medium difficulty hike. You have to climb up and down a bunch of large rocks. You need to watch your step here and there. And you need to pay attention to the trail. I ended up making several wrong turns - oops.
"Is it really worth it to do all this hiking just to see this one arch??" That's what the lazy person in me wondered several times during the hike. But once you get to the Delicate Arch area, all those bad thoughts disappear. You stand in awe. The reward at the end of the rainbow defies the imagination.
The first thing I realized was that Delicate Arch didn't just stand in the middle of some random, dull area. Instead, it's the majestic focal point of a huge sandstone fin. It looks and feels like you reached the summit of a mountain. It's not just the arch that makes Delicate Arch so famous; it's really the arch as well as the surrounding area that are so scenic and unique.
Delicate Arch stands on the ledge of an amazing sandstone formation. On one side, the formation is a cliff the drops you hundreds of feet to your doom. On the other side, the sandstone forms this bowl that kind of looks like a bathroom sink.
Can you see all the tiny humans in the distance in the photos? Yes, they are still far away! You need to hike around to the left to circumvent the deadly cliff and huge bowl. Once you arrive, you can take a relax with the other tourists (once again, there were lots of French and Germans) and admire the scenery. Delicate Arch is best seen in the evening, because the evening sun shines radiantly against the rock. The sunlight is so warm and radiant. The La Sal Mountains provide an awesome backdrop too. I could probably sit there for hours to admire the beauty.
I did some planning in advance before this hike. I looked up when the sunset would be, and I timed my hike such that I would get to the arch in plenty time for the sunset. One thing I didn't account for, however, is the big rock formation standing between Delicate Arch and the sun. The sun rays that shined on the arch got blocked by the rock formation, much earlier than the actual time of sunset. You can see the shadow in the photo above. I thus had only about 15 minutes of shooting the Arch with the sun shining directly on it. I'm pretty happy with these photos, but I could have used more time to shoot more angles.
Here's a shot of the arch, taken after the direct sunlight waned. Note how big the arch is, compared to the random dude! Also this photo may illustrate how some people call this arch the "Cowboy's Chaps." The arch reminded me personally of the legs of action figure toys like He-Man :)
As I wrote earlier, being at Delicate Arch felt like being at the summit of a mountain. You get to see some great panoramic views of the area. I stood here (along with all those other hikers) to catch the sunset too.
After taking in the sunset, I headed back down the trail - a 1.5 mile hike of downhill suffering. But the high of the beautiful scenery kept me going and happy.
Nightcap at Balanced Rock
When you live in downtown Chicago, one thing you get used to is all the city lights. They never die. At Arches, there are hardly any lights. It's just you, the stars, and moon. I decided to hang out at the park for a while and just stare at the sky. The crickets provided a good soundtrack as well. Sometimes you kind of forget that all these things can be seen in the sky....
The above photo was one of the last photos taken on my camera. Just a few minutes later, the shutter died. I haven't been able to take a photo since :( It's at the shop now - $240 of repairs! Eww. But hey, what is the price for good art and good memories? At least it broke at the end of my trip and not at the beginning....
Trip Conclusion
The next morning, I packed up my gear and drove back to Salt Lake City. I flew home later that afternoon. The final toll for the weekend: 1800 miles flying, 1000 miles driving, and 15 miles hiking! Not to mention 600 photos taken and 4 gallons of water consumed. Phew! :)
The trip was well worth the effort. I would do it again in a heartbeat. Arches and Canyonlands were such beautiful parks. I am still in awe of the scenery at Delicate Arch. I was originally a little nervous about hiking by myself in the middle of the summer heat, but it wasn't bad at all, as long as you were a little careful with water. Now I need to return to Utah a few more times. I need to visit Zion, Bryce, Antelope Canyon, and Monument Valley national parks. Wanna join me? :)
Check out this article and others from my blog:
- This article
- All articles on Utah 2010 trip
- Slideshow of Utah 2010 trip photos on Flickr
- Blog home
Courthouse Towers Area
The Courthouse Towers area is the first major area you see in the park. There are several attractions clustered here. Park Avenue is a kind of valley between two large sets of rock formations. The rocks are at least 100 feet high. In the first photo below, the Park Avenue Trail takes you along the valley for a mile. The crazy long but skinny rock structure (known as a "sandstone fin") on the right is the Organ. I think it is supposed to look like the pipes of a large pipe organ in a church.
The next two photos below are of rock structures found on the left side of the above Park Avenue photo. The first photo is of the first big formation along Park Avenue. I don't know what its name is though. The second photo is of the Three Gossips.
Courthouse Towers is a pretty imposing structure itself. Look how small the cars look compared to the Towers! The Park Avenue trail ends at Courthouse Towers. You can drive directly there too.
Balanced Rock
The next major section of the park is the Windows. I actually went here on Saturday morning, to catch the sunrise. One landmark I skipped, however, was Balanced Rock. It's supposed to shoot better with evening light. As the name suggests, it's a large round rock that is balanced on a column of rock. Don't breathe too hard - it might fall!
Delicate Arch
The highlight of Arches National Park is Delicate Arch. In a park full of arches, Delicate Arch stands above the rest. It's Utah's state symbol, in fact. And it might be the most well known arch in the world. Maybe the only exception is l'Arc de Triomphe in Paris, but that arch was built slightly differently haha...
In many parks, the most well-known attractions are super easy to get to. This is not true about Delicate Arch. Yes, there's a "viewpoint" for the arch that is right next to a parking lot. But the view is from 1.5 miles away. You need a good pair of binoculars to see anything from the viewpoint. Therefore, you have to go on a hike in order to see the arch for real.
The Delicate Arch Trail is a short, but surprisingly difficult hike. It's only 1.5 miles long, no big deal. But it's almost a 500 foot climb, and parts of the hike involve walking along rock ledges. Don't get me wrong - it's not super hard. But you need to be reasonably fit and have some decent balance to get there. Oh yeah, the hike is very exposed to the sun. So bring a hat, sunscreen, and lots of water. Also, going in the evening is much safer on the skin.
The hike starts out really easy. The first half mile of the trail is pretty flat and well worn. It's a breeze, and you feel like you'll get to Delicate Arch any second now....
Then you get to the second half mile - the hard part of the trail. Most of the climbing on the trail is done in this second half mile. You have to hike up a mountain of slickrock (see photo above) at a constant 15-30 degree angle. To digress a little, I don't know why it's called slickrock; the rock is actually rather sticky and provides good traction. Anyways, you'll probably get a bit winded though. I certainly did, but I made it fine enough. I suffered a bit, however, climbing down the slickrock. The descent at a constant 15-30 degrees caused a lot of stress on my bad knee; there are no switchbacks on this trail. My knee was a bit sore the next day.
The third half mile is much more palatable - a medium difficulty hike. You have to climb up and down a bunch of large rocks. You need to watch your step here and there. And you need to pay attention to the trail. I ended up making several wrong turns - oops.
"Is it really worth it to do all this hiking just to see this one arch??" That's what the lazy person in me wondered several times during the hike. But once you get to the Delicate Arch area, all those bad thoughts disappear. You stand in awe. The reward at the end of the rainbow defies the imagination.
The first thing I realized was that Delicate Arch didn't just stand in the middle of some random, dull area. Instead, it's the majestic focal point of a huge sandstone fin. It looks and feels like you reached the summit of a mountain. It's not just the arch that makes Delicate Arch so famous; it's really the arch as well as the surrounding area that are so scenic and unique.
Delicate Arch stands on the ledge of an amazing sandstone formation. On one side, the formation is a cliff the drops you hundreds of feet to your doom. On the other side, the sandstone forms this bowl that kind of looks like a bathroom sink.
Can you see all the tiny humans in the distance in the photos? Yes, they are still far away! You need to hike around to the left to circumvent the deadly cliff and huge bowl. Once you arrive, you can take a relax with the other tourists (once again, there were lots of French and Germans) and admire the scenery. Delicate Arch is best seen in the evening, because the evening sun shines radiantly against the rock. The sunlight is so warm and radiant. The La Sal Mountains provide an awesome backdrop too. I could probably sit there for hours to admire the beauty.
I did some planning in advance before this hike. I looked up when the sunset would be, and I timed my hike such that I would get to the arch in plenty time for the sunset. One thing I didn't account for, however, is the big rock formation standing between Delicate Arch and the sun. The sun rays that shined on the arch got blocked by the rock formation, much earlier than the actual time of sunset. You can see the shadow in the photo above. I thus had only about 15 minutes of shooting the Arch with the sun shining directly on it. I'm pretty happy with these photos, but I could have used more time to shoot more angles.
Here's a shot of the arch, taken after the direct sunlight waned. Note how big the arch is, compared to the random dude! Also this photo may illustrate how some people call this arch the "Cowboy's Chaps." The arch reminded me personally of the legs of action figure toys like He-Man :)
As I wrote earlier, being at Delicate Arch felt like being at the summit of a mountain. You get to see some great panoramic views of the area. I stood here (along with all those other hikers) to catch the sunset too.
After taking in the sunset, I headed back down the trail - a 1.5 mile hike of downhill suffering. But the high of the beautiful scenery kept me going and happy.
Nightcap at Balanced Rock
When you live in downtown Chicago, one thing you get used to is all the city lights. They never die. At Arches, there are hardly any lights. It's just you, the stars, and moon. I decided to hang out at the park for a while and just stare at the sky. The crickets provided a good soundtrack as well. Sometimes you kind of forget that all these things can be seen in the sky....
The above photo was one of the last photos taken on my camera. Just a few minutes later, the shutter died. I haven't been able to take a photo since :( It's at the shop now - $240 of repairs! Eww. But hey, what is the price for good art and good memories? At least it broke at the end of my trip and not at the beginning....
Trip Conclusion
The next morning, I packed up my gear and drove back to Salt Lake City. I flew home later that afternoon. The final toll for the weekend: 1800 miles flying, 1000 miles driving, and 15 miles hiking! Not to mention 600 photos taken and 4 gallons of water consumed. Phew! :)
The trip was well worth the effort. I would do it again in a heartbeat. Arches and Canyonlands were such beautiful parks. I am still in awe of the scenery at Delicate Arch. I was originally a little nervous about hiking by myself in the middle of the summer heat, but it wasn't bad at all, as long as you were a little careful with water. Now I need to return to Utah a few more times. I need to visit Zion, Bryce, Antelope Canyon, and Monument Valley national parks. Wanna join me? :)
Check out this article and others from my blog:
- This article
- All articles on Utah 2010 trip
- Slideshow of Utah 2010 trip photos on Flickr
- Blog home
Monday, July 12, 2010
Recipe: Thai peanut noodles with chicken
Asian food is yummy! For busy/lazy single folks like myself, Asian food is great because it's fairly easy to make yet is pretty healthy (I think). Today I made some Thai peanut noodles with chicken for lunch. Here's how it was done.
The first thing to do is to figure out what ingredients to use. This dish, like most Asian dishes, is balanced and is very versatile - you can change the ingredients yet deliver the same dish. Here's what I went with today:
- Noodles: Udon (thick Japanese white flour noodles). People normally use egg noodles with this dish, but who cares, as long as it tastes good? :)
- Meat: Bone-in chicken thighs, chopped into 3-5 pieces with a cleaver. You can use all sorts of other meats: pork, beef, fish, shrimp, squid, even frog legs...
- Veggies: Cabbage and cucumbers (the only veggies left in the fridge). You can use all sorts of other veggies: broccoli, asparagus, carrots, peas, bamboo shoots, Chinese broccoli, bok choy...
Other cooking ingredients you'll need:
- Creamy peanut butter - yes, the normal stuff like Jif or Peter Pan!
- Chopped onions
- Garlic
- Soy sauce
- Sugar
- Water or chicken broth
- Oil, like sesame oil
- Optional hot stuff, like hot red peppers or red pepper flakes
Heat up a large, heavy saucepan to high and throw the oil, onions, and garlic on it. We're gonna do some sautee-ing. Make sure your saucepan is large enough for the meat AND the noodles later on. Once you see some sizzling, put the meat on. I usually put a little water in there too, to get some moisture going. You don't want a pan that is too dry, especially with chicken (or pork). Also with chicken, I put the lid on and let it go for a bit, to cook the meat thoroughly. For meats like beef, you won't have to cook it very long.
While the meat is cooking, boil some water in a pot. We'll cook the noodles there. Put some salt in the water if you're worried about the noodles sticking to the pot. When the noodles get a little soft, take them out and put them in a strainer. Don't let the noodles get too soft; it's better to err on the side of being a little too hard ("al dente" hehe).
Now we'll prepare the peanut sauce. It's pretty easy. Scoop out a few tablespoons of the peanut butter into a bowl. Then throw a few teaspoons of soy sauce in the bowl. Also put a little water (or chicken broth) in there. I don't want to specify quantities since people make different proportions. Not to mention, we always make errors, so it's best of adjust on-the-fly. The goal is to have enough sauce to cover all your noodles. Start stirring. We want the sauce to be much less thick than the peanut butter, but it still needs to be kind of heavy and sticky so it can stick to the noodles. To thin the sauce, use more water. To thicken the sauce, add more peanut butter. Put peppers in the sauce to your liking.
Once the meat is cooked and the noodles are ready, place the noodles and the sauce in the saucepan, on medium to low heat. Stir and stir. Once the peanut sauce is evenly spread, voila, we're done! You can do this all in about 20 or 30 minutes. Yum! :)
The first thing to do is to figure out what ingredients to use. This dish, like most Asian dishes, is balanced and is very versatile - you can change the ingredients yet deliver the same dish. Here's what I went with today:
- Noodles: Udon (thick Japanese white flour noodles). People normally use egg noodles with this dish, but who cares, as long as it tastes good? :)
- Meat: Bone-in chicken thighs, chopped into 3-5 pieces with a cleaver. You can use all sorts of other meats: pork, beef, fish, shrimp, squid, even frog legs...
- Veggies: Cabbage and cucumbers (the only veggies left in the fridge). You can use all sorts of other veggies: broccoli, asparagus, carrots, peas, bamboo shoots, Chinese broccoli, bok choy...
Other cooking ingredients you'll need:
- Creamy peanut butter - yes, the normal stuff like Jif or Peter Pan!
- Chopped onions
- Garlic
- Soy sauce
- Sugar
- Water or chicken broth
- Oil, like sesame oil
- Optional hot stuff, like hot red peppers or red pepper flakes
Heat up a large, heavy saucepan to high and throw the oil, onions, and garlic on it. We're gonna do some sautee-ing. Make sure your saucepan is large enough for the meat AND the noodles later on. Once you see some sizzling, put the meat on. I usually put a little water in there too, to get some moisture going. You don't want a pan that is too dry, especially with chicken (or pork). Also with chicken, I put the lid on and let it go for a bit, to cook the meat thoroughly. For meats like beef, you won't have to cook it very long.
While the meat is cooking, boil some water in a pot. We'll cook the noodles there. Put some salt in the water if you're worried about the noodles sticking to the pot. When the noodles get a little soft, take them out and put them in a strainer. Don't let the noodles get too soft; it's better to err on the side of being a little too hard ("al dente" hehe).
Now we'll prepare the peanut sauce. It's pretty easy. Scoop out a few tablespoons of the peanut butter into a bowl. Then throw a few teaspoons of soy sauce in the bowl. Also put a little water (or chicken broth) in there. I don't want to specify quantities since people make different proportions. Not to mention, we always make errors, so it's best of adjust on-the-fly. The goal is to have enough sauce to cover all your noodles. Start stirring. We want the sauce to be much less thick than the peanut butter, but it still needs to be kind of heavy and sticky so it can stick to the noodles. To thin the sauce, use more water. To thicken the sauce, add more peanut butter. Put peppers in the sauce to your liking.
Once the meat is cooked and the noodles are ready, place the noodles and the sauce in the saucepan, on medium to low heat. Stir and stir. Once the peanut sauce is evenly spread, voila, we're done! You can do this all in about 20 or 30 minutes. Yum! :)
Tuesday, June 8, 2010
A stroll through Madrid
Whew, it's been a while since I've written anything. Sorry! Let me continue my travel blogging with Madrid. My flight in April to Istanbul required a layover somewhere in western Europe. Layovers are usually annoying. But this time, I thought I'd make the best of it by scheduling a long 11-hr layover in Madrid and visiting the city between flights. I had never been to Spain before. It was totally the right call! :)
It takes a while to fly from the States to Europe. It was 8 hrs from Chicago to Madrid. My flight was a red-eye - arriving at 9am Madrid time. You could say the long flight stinks, but actually I kind of like it because you actually have time for a good night's sleep. My plan: board the plane, have some dinner, enjoy a glass of wine, and maybe pop a Nyquil, brush your teeth - then bam, you fall asleep. 5-6 hours later, they'll wake you up for breakfast, the plane lands, and it's a brand new exciting day in Spain!
An 11-hr layover seems like a long time, but it isn't. Luckily, Madrid is a compact, walkable city. Once I got off the plane, I walked through customs just with my backpack (big luggage was checked through), and hopped on the Metro train at the airport. 30 minutes later (2 Metro transfers), I arrived at the Plaza Puerta del Sol. Armed with my camera gear and my Lonely Planet pocket guide, I began to explore Madrid.
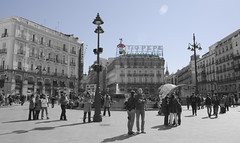
Sol is Madrid's city center. At the surface, it's just a plaza with a fountain, a statue, and several streets intersecting it, but it's much more. It's full of life and activity. Everyone seems to pass by Sol. You see tourists like me walking around snapping photos. You see business people grabbing some coffee or taking a smoke break. You see locals going shopping or eating food. Maybe it's Madrid's equivalent to London's Picadilly Circus?
Madrid is a beautiful city. Its landmarks, however, are not as well-known as the "big" European cities like Paris, London, or Rome. The two most famous landmarks are pretty close to Sol - the Plaza Mayor and the Palacio Real. The three locations form a triangle that is very walkable - probably only 2km total.
The walk was amazing. The city is so beautiful, orderly, and clean. Every building facade is adorable, every side street has charm, every store is alluring. Most of my time that day was spent walking down random side streets and just gazing around. I hardly used my Madrid guide and map; it was more fun just to follow my whims and see what Madrid had to offer.
The Plaza Mayor was pretty cool. It's a huge plaza only reachable on foot. It's a great place for the locals to gather and relax, sitting on a chair under an umbrella, with a coffee in hand. I don't think there's an equivalent in the States, but you'll see places like this all over Europe, especially in Italy (my fave is the Piazza del Campo in Siena).
I was in love with all the little stores in Madrid. Each one had so much charm. I ended up taking a bunch of photos of them :)
After more meandering, I finally got to the Palacio Real (aka Palacio de Oriente). It's a huge palace that serves as the "official" or ceremonial home of the Spanish King. It's kind of like the Versailles of Madrid hehe. The Royal Family is apparently not so ostentatious, so they actually live in a more modest place elsewhere.
Madrid is organized by various "barrios" (districts), each with its own personality. So far, I've shown you the Centro barrio. I also visited the barrio called La Latina, just south of Centro. La Latina is supposed to be a lively place with many cool little shops. La Calle de la Cava Baja is supposed to be a super fun spot to eat and drink, but not at noon haha (the Spanish don't eat lunch til much later). I spent the rest of the day wandering around La Latina.
There's one thing you MUST do when you go to Spain - eat Spanish food! Wow. So tasty! No wonder people take long lunches and have 3-4 hr dinners. Yum!
I had to try some tapas, of course. Lonely Planet directed me to the famous restaurant Casa Labra, just a block or two north of Sol. Apparently ordering tapas works a little differently in Spain. Sometimes you can order small plates like we're used to in the States. But other times, you order by the morsel. You'll see below that I ordered "dos de bacalao" - two morsels of cod, which was apparently all the rage. There was a line for the bacalao, which came right out of the fryer for you to grab. Sorry Brits, the bacalao was tastier than your fish and chips!
Madrid also has "Madrilenos", or local, food. I went to a random restaurant and randomly ordered something. You know, just kinda pointing at something on the menu :) What I got was some kind of casserole with egg and shrimp. Quite tasty! Even funnier - I was served by a Chinese woman speaking Spanish :)
Aaah, what a beautiful day it was to visit Madrid! I am so glad I turned an annoying layover into an exhilarating visit to a new country. I am a bit jealous of the lifestyle in Spain. People were relaxed, they knew how to enjoy themselves, and they didn't seem to get overburned by work or materialism, as we often do in the States. It just seemed to be the right balance. Now I'm looking forward to a visit to see the rest of Spain! Who's coming? :)
Links:
- This Madrid article on my blog
- My Madrid album on Flickr
Subscribe to:
Posts (Atom)